Putting your house on the market is more than just a transaction; it’s a high-stakes launch event. Think of it like a movie premiere—you only get one chance to make a stunning first impression. Nailing that top-dollar offer and a quick sale isn’t about luck; it’s about a well-executed strategy that anticipates what buyers want before they even know they want it.
This isn’t just another generic to-do list. This is your battle plan for a successful sale, a detailed prepare house for sale checklist packed with actionable insights that go beyond the obvious ‘clean your closets’ advice. We’re diving deep into the psychology of buyers and the practical, punchy steps that make them fall in love at first sight, turning browsers into bidders. The principles for maximizing your return are universal: meticulous preparation is everything.
Let’s walk through the critical steps that transform a ‘house for sale’ into a ‘must-have home’. From decluttering with a professional eye to compiling the necessary paperwork that builds buyer confidence, we’ll cover the essential tasks. These are the strategies that make all the difference, and we’re sharing the complete playbook with you. It’s time to get your property ready for its close-up.
1. Declutter and Depersonalize Your Home
The first, and arguably most crucial, step in any successful “prepare house for sale checklist” is to transform your lived-in house back into a marketable product. This process, known as decluttering and depersonalizing, is about methodically removing personal items, excess furniture, and general clutter. The goal is to create a neutral, spacious, and inviting environment where potential buyers can easily visualize their own lives unfolding, rather than getting distracted by yours.

Think of it as pre-packing with a purpose. By clearing surfaces and thinning out furniture, you make rooms appear larger, brighter, and more functional. This isn’t just tidying up; it’s a strategic move to highlight your home’s best features, like its square footage and architectural details, allowing buyers to focus on the space itself, not the stuff within it.
Actionable Steps for Implementation
To effectively declutter and depersonalize, break the process down into manageable tasks. Start this process at least a month or two before you plan to list to avoid last-minute panic.
- Remove Personal Touches: Pack away family photos, kids’ artwork, trophies, and personal collections. Replace them with neutral art or simple decorative objects to create a welcoming, yet impersonal, vibe.
- Clear All Surfaces: Kitchen and bathroom counters should be almost completely clear. Leave out only a few essential, stylish items, like a high-end coffee maker or a decorative soap dispenser.
- The 30-50% Furniture Rule: To max out the perception of space, aim to remove 30-50% of your furniture. This might mean storing an extra armchair, a bulky bookshelf, or that oversized coffee table. Keep only the pieces that define the room’s purpose and allow for an easy traffic flow.
- Employ the ‘One-Year Rule’: Go through closets, cabinets, and storage areas. If you haven’t used an item in the past year, it’s a prime candidate for packing, donating, or selling. This gives you a head start on moving and makes your storage spaces look ample and organized.
2. Deep Clean Every Room and Surface
Once you’ve decluttered, the next essential item on your “prepare house for sale checklist” is to perform a meticulous deep clean. This goes way beyond a typical weekend tidy-up; it involves a comprehensive, top-to-bottom scrub of every nook, cranny, and surface. A spotlessly clean home signals to buyers that the property has been well-maintained, which builds confidence and can directly translate into stronger, faster offers.
Think of deep cleaning as a powerful marketing tool. Sparkling windows maximize natural light, making rooms feel brighter and more inviting. Gleaming appliances and pristine grout in kitchens and bathrooms suggest modern and well-cared-for spaces. A home that is impeccably clean simply feels more valuable and lets buyers focus on its features without being distracted by dirt or grime.
Actionable Steps for Implementation
To execute a pro-level clean, you need a system. Plan to conduct the most intensive cleaning just before your professional listing photos are taken to ensure the home looks its absolute sharpest.
- Work Top-to-Bottom: In each room, start with the highest points like ceiling fans and light fixtures, then move down to walls, windows, and finally baseboards and floors. This stops dust and debris from messing up already-cleaned surfaces.
- Focus on Kitchens and Bathrooms: These rooms get the most scrutiny from buyers. Deep clean all appliances inside and out, scrub tile grout until it’s bright, descale faucets, and polish all fixtures until they shine.
- Don’t Forget the Details: Clean areas you normally overlook, such as inside cabinets and drawers, window tracks, light switch plates, and door frames. For a comprehensive approach, consider following an ultimate end of tenancy cleaning checklist to make sure no detail is missed.
- Hire Professionals When Needed: While you can do a lot yourself, investing in professional services for tasks like carpet steaming, window washing, or power washing the exterior can provide a high-impact return and save you a ton of time and effort.
3. Complete Essential Repairs and Maintenance
After the big clean, the next vital task in your “prepare house for sale checklist” is tackling all the necessary repairs and deferred maintenance. Those small, often-overlooked issues, like a dripping faucet or a squeaky door, can collectively create a negative impression. Buyers might see these minor flaws as signs of larger, hidden problems, leading them to question the property’s upkeep and potentially lowball their offer.
Addressing these fixes proactively demonstrates pride of ownership and reassures potential buyers that the home has been well-cared-for. It’s a strategic investment that eliminates red flags, smooths the inspection process, and helps you lock in the best possible sale price. A well-maintained home simply feels more valuable and move-in ready.
Actionable Steps for Implementation
To systematically handle repairs, create a comprehensive list by walking through your home with a critical eye, just as a buyer would. Focus on the details that impact a home’s first impression and functionality.
- Tackle the “Annoyance List”: Start with the obvious stuff. Fix leaky faucets, tighten loose handles on cabinets and doors, repair running toilets, and patch any nail holes or cracks in the walls. These are quick wins that make a huge difference.
- Focus on Functionality and Safety: Make sure all light switches work and replace any burned-out bulbs to maximize brightness in every room. Check that all doors and windows open and close smoothly. Test smoke detectors and replace batteries.
- Prioritize Curb Appeal Repairs: First impressions matter. Repair cracked walkways, fix broken fence slats, replace a faulty doorbell, and ensure the garage door operates correctly.
- Consider a Pre-Inspection: To uncover issues you might miss, a professional pre-inspection can be a game-changer. It provides a detailed report, letting you address problems before they become negotiation leverage for a buyer. You can get more details on how to get your home ready for a formal review and prepare for a home inspection.
4. Enhance Curb Appeal and First Impressions
The very first judgment a potential buyer makes happens before they even step through the front door. This crucial “first impression” is dictated by your home’s curb appeal, making it a pivotal element in any “prepare house for sale checklist”. Sprucing up your property’s exterior isn’t just about aesthetics; it’s a strategic investment that can directly influence showing requests, offer amounts, and the speed of your sale. A welcoming, well-maintained exterior signals that the entire home has been cared for.
This visualization highlights the powerful return on investment that comes from focusing on your home’s exterior.
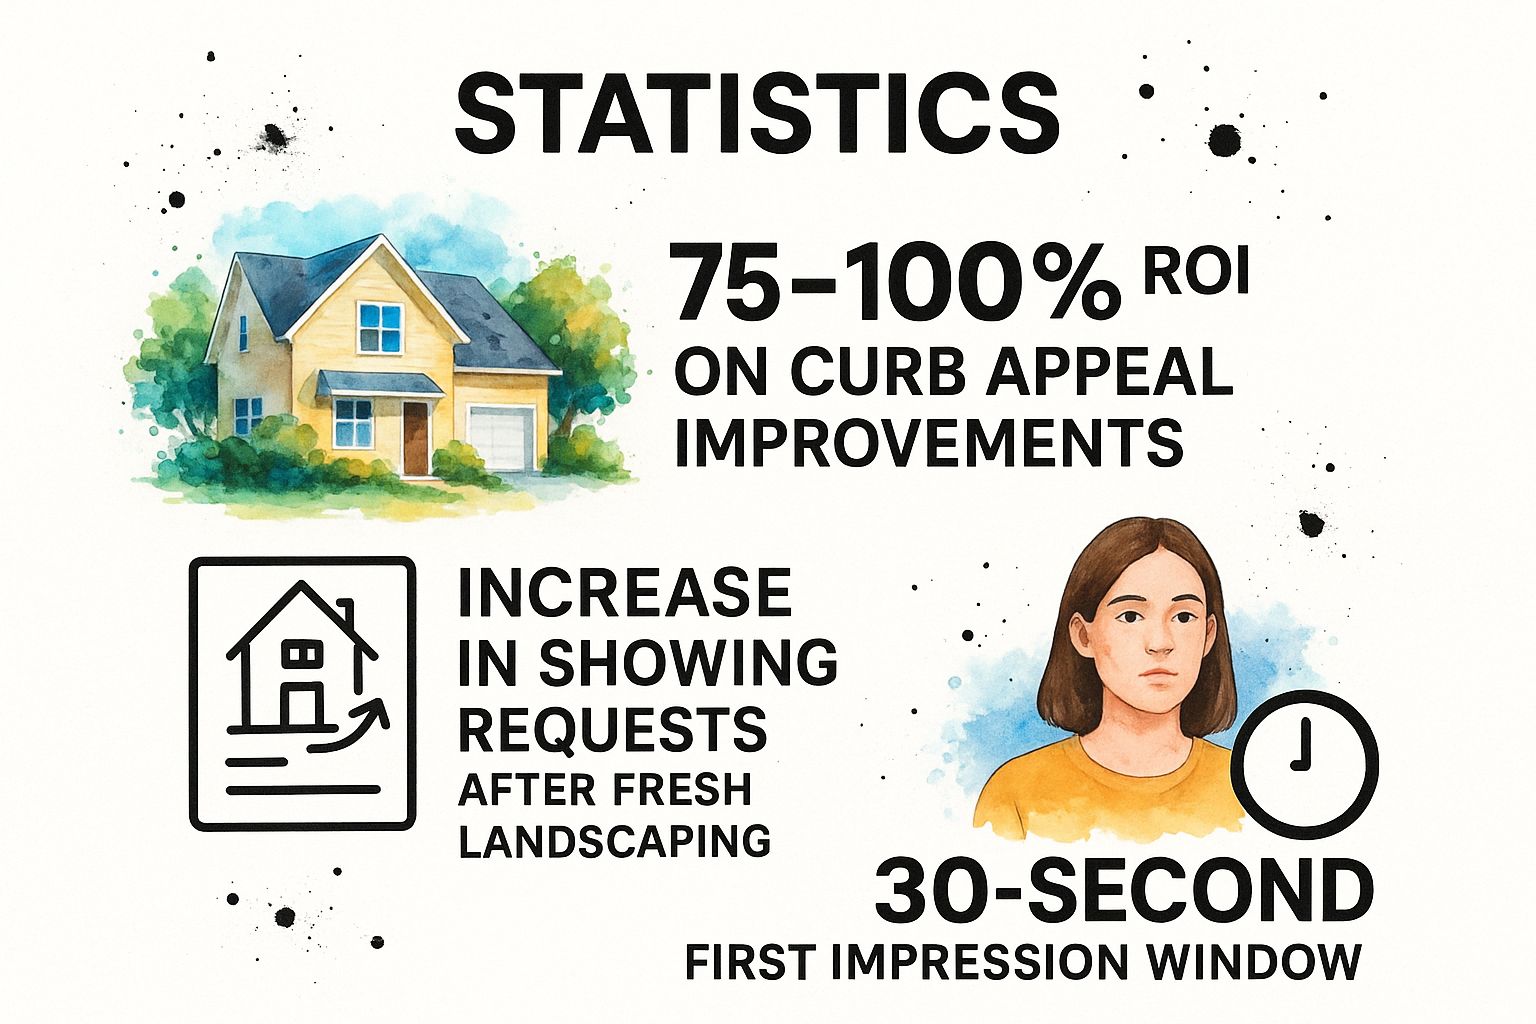
These statistics underscore a key real estate truth: buyers form lasting opinions within seconds, and a strong exterior presentation significantly boosts both buyer interest and perceived value.
Actionable Steps for Implementation
To maximize your home’s curb appeal, focus on high-impact, low-cost improvements that create a clean, inviting, and manicured look. Start these projects about a month before listing to give plants time to settle and to handle any weather delays.
- Power Wash Everything: A thorough power washing of your home’s siding, driveway, walkways, and patios can instantly make the entire property look newer and brighter. This simple step removes years of accumulated dirt and grime for an immediate impact.
- Refresh Landscaping: You don’t need a complete overhaul. Start by mowing the lawn, trimming overgrown bushes, and pulling all weeds. Adding a fresh layer of dark mulch to flower beds creates sharp, clean lines and makes existing plants pop with color.
- Focus on the Front Door: Your front entrance is the focal point. Apply a fresh coat of paint in a classic, welcoming color like black, navy, or a deep red. Polish or replace the door hardware, update the house numbers, and install a new, stylish light fixture for a modern touch.
- Add Symmetry and Color: Symmetrical arrangements are pleasing to the eye. Place identical potted plants or lanterns on either side of the front door. Add a splash of seasonal color with flowers in planters or window boxes to create a vibrant, cheerful welcome. Beyond basic landscaping, there are many clever and affordable ways to refresh your home’s exterior to make your property stand out.
5. Stage Key Rooms for Maximum Appeal
Once your home is decluttered and clean, the next step in the “prepare house for sale checklist” is to strategically stage key rooms. Staging goes beyond decorating; it’s about arranging furniture and décor to showcase each room’s best features, define its purpose, and create an aspirational lifestyle that resonates with buyers. The objective is to help them form an emotional connection, allowing them to envision themselves living happily in the space.
This isn’t just about making the house look pretty; it’s a proven marketing tactic. Staged homes often sell faster and for a higher price because they present a polished, move-in-ready product. By highlighting flow and functionality, staging removes buyer guesswork and showcases your home’s full potential, making it stand out from the unstaged competition.
Actionable Steps for Implementation
Focus your staging efforts on the rooms that have the most significant impact on a buyer’s decision. This usually includes the living room, kitchen, primary bedroom, and dining area.
- Define Each Room’s Purpose: Arrange furniture to create clear, functional zones. For example, set up a conversation area in the living room or stage a spare room as a home office to appeal to remote workers.
- Create a Luxury Feel: Style the primary bedroom to resemble a high-end hotel suite. Use crisp, neutral bedding, add plush pillows, and ensure nightstands are clear except for a stylish lamp and a book.
- Master Furniture Placement: Ensure furniture is proportional to the room’s size. Pull couches and chairs away from the walls to create a more intimate and spacious feeling. The goal is to establish an easy-to-navigate traffic flow.
- Accessorize Thoughtfully: Use neutral colors for large items and add pops of color with pillows, throws, or a simple centerpiece. Add life and vibrancy with fresh flowers or green plants, and hang a large mirror to make a small room feel bigger and brighter.
6. Optimize Lighting Throughout the Home
A critical, yet often overlooked, element in any “prepare house for sale checklist” is the strategic optimization of your home’s lighting. Bright, well-lit spaces appear larger, cleaner, and significantly more welcoming to potential buyers. The goal is to create a bright and airy atmosphere that not only looks stunning in listing photos but also makes a powerful impression during in-person showings, making the home feel more expensive and well-maintained.
Think of light as a staging tool. By maximizing both natural and artificial light, you can highlight your home’s best features, from gleaming hardwood floors to freshly painted walls. This isn’t just about flipping a switch; it’s about layering light sources to eliminate dark corners and create an inviting ambiance that helps buyers feel positive and at home from the moment they step inside.
Actionable Steps for Implementation
To effectively optimize your home’s lighting, focus on simple, high-impact changes that create a cohesive and bright environment. Start this process a few weeks before photos are scheduled.
- Standardize Your Bulbs: Walk through your home and replace any mismatched, dim, or burnt-out bulbs. Opt for bright, consistent LED bulbs (soft white or daylight) in all fixtures to create a uniform and modern look. This small investment makes a huge difference.
- Maximize Natural Light: Ditch heavy, dark drapes and replace them with sheer curtains or light-filtering blinds that let sunlight pour in. Before every showing, make sure all blinds and curtains are fully open. Clean all windows, inside and out, to let in the maximum amount of light.
- Layer Your Lighting: Don’t rely solely on overhead fixtures. Add table lamps and floor lamps to rooms to create warm, inviting pools of light, especially in corners that might otherwise feel dark. Installing simple under-cabinet lighting in the kitchen is a quick upgrade that adds a touch of luxury. For more ideas, you can learn more about brightening your home decor with lighting on acme-re.com.
- Use Mirrors Strategically: Place a large mirror directly across from a primary window to effectively double the amount of natural light in a room. This simple trick can make smaller rooms, like entryways or hallways, feel significantly larger and more open.
7. Neutralize Paint Colors and Update Walls
One of the most cost-effective and highest-impact updates you can make in your “prepare house for sale checklist” is applying a fresh coat of neutral paint. This simple step can completely transform your home’s interior, making it appear brighter, larger, and more modern. Bold, personalized color choices can be a major turn-off for buyers, as it becomes one more project they have to tackle upon moving in. Neutralizing your walls creates a blank canvas, allowing potential buyers to mentally move their own furniture and artwork into the space.
Think of a fresh paint job as a reset button for your home. It instantly erases years of scuffs, marks, and daily wear-and-tear, signaling to buyers that the property is well-maintained and move-in ready. A cohesive, neutral palette from room to room also creates a sense of flow and harmony, making the entire home feel more unified and thoughtfully designed. This isn’t about erasing personality; it’s about maximizing appeal to the widest possible audience.
Actionable Steps for Implementation
To properly neutralize your home’s color scheme, plan this task for after major repairs but before professional cleaning or staging.
- Select Versatile Neutrals: Stick to proven, crowd-pleasing colors. Popular choices include soft grays (like “Agreeable Gray”), warm beiges (“greige”), or crisp off-whites. These shades act as a perfect backdrop for any decor style. Painting over a dark purple bedroom with a light, soft gray can make the room feel twice as large and appeal to a much broader demographic.
- Test Your Colors: Before you commit, buy sample pots and paint large swatches on several walls in each room. See how the color looks throughout the day in different lighting conditions, from bright morning sun to artificial evening light.
- Don’t Forget the Trim: A fresh coat of white or off-white paint on baseboards, door frames, and window sills makes the entire room pop. A semi-gloss finish is ideal for trim as it’s durable and easy to clean.
- Hire or DIY Strategically: While painting can be a DIY project, consider hiring professionals for a flawless finish, especially for high-traffic areas, ceilings, or if you have complex trim work. A pro job can save time and prevent costly mistakes.
8. Organize Important Documents and Disclosures
Beyond the physical preparations, a critical part of any “prepare house for sale checklist” involves getting your paperwork in order. This step means gathering all property-related documents, from disclosures and warranties to utility bills and HOA information. Having everything organized from the start demonstrates transparency, builds buyer confidence, and significantly streamlines the whole transaction.
Think of it as creating a comprehensive user manual for your home. When potential buyers and their agents can quickly access information about the property’s history, maintenance, and associated costs, it removes uncertainty and can prevent delays during negotiations and escrow. A well-prepared document package shows you are a serious, organized seller and can even help justify your asking price.
Actionable Steps for Implementation
To effectively organize your documents, start early and create a central file—both physical and digital. This proactive approach prevents a last-minute scramble for misplaced paperwork.
- Gather Essential Records: Compile recent utility bills (gas, electric, water), property tax statements, and the original purchase contract. Include detailed records of any major improvements or renovations, complete with permits and receipts, to substantiate your home’s value.
- Compile Warranties and Manuals: Collect all transferable warranties and user manuals for appliances, the HVAC system, the roof, and any other major components of the home. Providing these to the new owner is a valuable and appreciated gesture.
- Organize HOA and Disclosure Forms: If your home is part of a Homeowners Association, gather all relevant documents, including bylaws, CC&Rs (Covenants, Conditions, and Restrictions), and recent financial statements. Work with your real estate agent to complete all legally required property disclosure forms accurately and honestly.
- Create a Digital Backup: Scan all your documents and save them to a secure cloud-based folder. This not only serves as a backup but also makes it incredibly easy to share necessary files with your agent, the buyer’s agent, and the title company, expediting the entire closing process.
8-Step House Sale Prep Checklist Comparison
| Preparation Step | Implementation Complexity 🔄 | Resource Requirements ⚡ | Expected Outcomes 📊 | Ideal Use Cases 💡 | Key Advantages ⭐ |
|---|---|---|---|---|---|
| Declutter and Depersonalize Your Home | Medium – time-intensive | Moderate – storage solutions needed | Improves buyer connection and perceived space | When aiming to create neutral, spacious feel | Enhances emotional buyer appeal, enlarges rooms |
| Deep Clean Every Room and Surface | High – labor-intensive | Moderate to High – may need pros | Creates pristine first impression and odor removal | Before listing photos and showings | Low-cost value boost, suggests good maintenance |
| Complete Essential Repairs and Maintenance | Medium to High – depends on repairs | Moderate to High – repair costs | Reduces buyer concerns and negotiation points | When visible defects or functional issues exist | Shows pride of ownership, good ROI potential |
| Enhance Curb Appeal and First Impressions | Medium – weather dependent | Moderate – landscaping, painting | Strong first impression with increased buyer interest | When exterior appearance impacts buyer turnout | High ROI, attracts more buyers |
| Stage Key Rooms for Maximum Appeal | Medium to High – professional costs | High – staging fees and rentals | Faster sales and higher sale prices | Targeting competitive markets and premium pricing | Boosts visualization, lifestyle appeal |
| Optimize Lighting Throughout the Home | Medium – may need electrical work | Low to Moderate – fixtures and bulbs | Enhances space brightness and listing photos | Improving photography and home ambiance | Makes rooms appear larger, inexpensive upgrade |
| Neutralize Paint Colors and Update Walls | Medium – labor-intensive | Moderate – materials and labor | Modern, neutral appearance attracting wide buyers | When walls have bold/distracting colors | Excellent ROI, brightens and enlarges spaces |
| Organize Important Documents and Disclosures | Low to Medium – time-consuming | Low – mostly organizational effort | Streamlines sale process, builds buyer trust | Selling process requiring transparency and speed | Speeds negotiations, reduces last-minute issues |
Your Next Move Starts Now
Navigating the journey from homeowner to successful seller can feel like a marathon, but as we’ve detailed, it’s really a series of manageable, strategic sprints. This comprehensive “prepare house for sale checklist” isn’t just about tidying up; it’s a blueprint designed to maximize your property’s market potential and secure the best possible return on your investment. By methodically addressing each area—from the transformative power of decluttering to the final, critical review of your paperwork—you are taking control of the narrative your home presents to potential buyers.
Think of it this way: each completed task removes a potential objection from a buyer’s mind. A deep-cleaned kitchen prevents them from seeing a project; a freshly painted neutral wall stops them from being distracted by your personal taste. You are systematically dismantling barriers and building a bridge between your property and a buyer’s aspirations.
From Checklist to Closed Sale: The Key Takeaways
The effort you invest now directly translates into tangible results later. Let’s distill the core principles from our checklist into three powerful takeaways:
- Create a Blank Canvas: The combined effect of depersonalizing, decluttering, and neutralizing your paint palette is profound. Your goal is to erase your own story from the walls so that buyers can immediately start writing theirs. When they can mentally place their furniture and envision their future, their emotional connection to the space skyrockets.
- First Impressions are Financial Impressions: Curb appeal isn’t just about aesthetics; it’s the opening statement of your home’s value proposition. A well-maintained exterior, from the lawn to the front door, signals that the entire property has been cared for. This initial confidence carries through the entire showing and can directly influence the strength of an offer.
- Sweat the Small Stuff (So Buyers Don’t Have To): Addressing minor repairs, optimizing lighting, and ensuring every corner is spotless are not minor details. These actions demonstrate meticulous care and build trust. A buyer who sees a dripping faucet or a dusty baseboard will inevitably wonder what larger, hidden issues might be lurking. Your diligence preempts doubt and showcases your home as a truly move-in-ready asset.
Completing this “prepare house for sale checklist” transforms your home from a personal residence into a premium product ready for the market. It’s an empowering process that positions you not just as a seller, but as a savvy marketer of one of your most significant financial assets. The path is clear, the steps are actionable, and the rewards are substantial. Your next chapter is waiting, and it begins with these deliberate preparations.
Ready to turn your checklist into a “Sold!” sign? Any market requires more than just preparation; it demands expert strategy. Let the seasoned professionals at ACME Real Estate guide you through every step, ensuring your property stands out and achieves its maximum value. Contact ACME Real Estate today to partner with a team that turns preparation into profit.
 ACME Real Estate | Los Angeles Boutique Real Estate Brokerage